

Sunday, July 24, 2011
Hydrangea Love
I shared back in April that my mom had gotten me 2 hydrangea plants for my birthday. Hydrangeas are one of my absolute favorite flowers. We had them in our wedding. I love the beautiful, huge blooms and how even just one bloom looks beautiful & full in a small vase.
 This plant had major transplant shock after we planted it (and I'm sure the fact that we had a couple of late snows didn't help!) Its leaves turned brown and it was looking sad and small next to the other plant of a different variety that fared much better. But, in the last few weeks, after a nervous call to the nursery by me earlier this spring (during which they assured me it wouldn't die even if the whole plant turned brown) and lots of care & watering by Truman, tons of new bright green leaves popped out and it began to look much healthier. Last week, my little hydrangea plant bloomed and I had such joy in my heart to see this single beautiful bloom! I had to take a photo to document it. There are lots of other buds growing, so I am hopeful that there will be many more blooms before the summer is over.
Friday, July 22, 2011
Food For Friday: Pizza Bites
I first heard about this recipe for Pizza Bites from my friend Wendy. She said they were delicious and I added them to our list of recipes to try. Mine didn't turn out as picture perfect as Annie's Eats did, but they were definitely delicious.
 These would make a great appetizer if you are entertaining or to take to a party, but we ate them for dinner as a modified "pizza." I served them with a side of spicy pesto spaghetti sauce for dipping.
 I followed Annie's Eats recipe except that I used this same night pizza dough from the Barefoot Contessa's Back to Basics cookbook because it didn't require as long to rise and I didn't have any bread dough on hand. You only need half of the dough to make 24 pizza bites.
Ingredients:
1 1/4 cups warm water
2 packages dry yeast
1 tablespoon honey
3 tablespoons olive oil
4 cups all-purpose flour (I use unbleached), plus extra for kneading
2 teaspoons Kosher salt
Directions:
In the bowl of an electric mixer fitted with a dough hook, combine the water, yeast, honey, and olive oil. When the yeast is dissolved, add 3 cups of flour and the 2 teaspoons of Kosher salt, and mix on medium-low speed. While mixing, add in 1 additional cup of flour so a soft dough forms. Mix on medium-low speed for 10 minutes. Turn out the dough onto a lightly floured surface, sprinkle the top with a little bit of flour, and knead it by hand a dozen times. It should be firm, but smooth and elastic. Place the dough in a well-oiled bowl (I use olive oil) and turn the dough over to cover it lightly with oil. Cover the bowl with a kitchen towel and allow the dough to rise at room temperature for 30 minutes. Dough is ready to be used after 30 minutes.
Note: This recipe will make 2 large or 6 small pizzas. Use half a batch of dough for 24 Pizza Bites. Leftover dough can be stored in a ziploc bag in the refrigerator for several days.
 The only other ways I deviated from the original recipe:
I baked our Pizza Bites in a square 8 inch pan instead of a pie pan because it was clean and already out. I was going for fast and easy!
I used fresh mozzarella cheese cut into 1 inch-ish cubes. I made half of our Pizza Bites with cheese only for me, and half with pepperoni for the hubs.
I grated fresh parmesan cheese on the top before baking.
One other thing to note, if you don't get the dough totally sealed around the cheese, or you stretch a tiny hole in the piece of dough as you are wrapping the bites, the cheese will ooze out during baking. I think this is especially true if you use fresh mozzarella like I did because it is softer and has more moisture in it than already cubed part skim mozzarella. They still tasted great and the little bit of oozed out cheese didn't bother me!


Ingredients:
1 1/4 cups warm water
2 packages dry yeast
1 tablespoon honey
3 tablespoons olive oil
4 cups all-purpose flour (I use unbleached), plus extra for kneading
2 teaspoons Kosher salt
Directions:
In the bowl of an electric mixer fitted with a dough hook, combine the water, yeast, honey, and olive oil. When the yeast is dissolved, add 3 cups of flour and the 2 teaspoons of Kosher salt, and mix on medium-low speed. While mixing, add in 1 additional cup of flour so a soft dough forms. Mix on medium-low speed for 10 minutes. Turn out the dough onto a lightly floured surface, sprinkle the top with a little bit of flour, and knead it by hand a dozen times. It should be firm, but smooth and elastic. Place the dough in a well-oiled bowl (I use olive oil) and turn the dough over to cover it lightly with oil. Cover the bowl with a kitchen towel and allow the dough to rise at room temperature for 30 minutes. Dough is ready to be used after 30 minutes.
Note: This recipe will make 2 large or 6 small pizzas. Use half a batch of dough for 24 Pizza Bites. Leftover dough can be stored in a ziploc bag in the refrigerator for several days.

I baked our Pizza Bites in a square 8 inch pan instead of a pie pan because it was clean and already out. I was going for fast and easy!
I used fresh mozzarella cheese cut into 1 inch-ish cubes. I made half of our Pizza Bites with cheese only for me, and half with pepperoni for the hubs.
I grated fresh parmesan cheese on the top before baking.
One other thing to note, if you don't get the dough totally sealed around the cheese, or you stretch a tiny hole in the piece of dough as you are wrapping the bites, the cheese will ooze out during baking. I think this is especially true if you use fresh mozzarella like I did because it is softer and has more moisture in it than already cubed part skim mozzarella. They still tasted great and the little bit of oozed out cheese didn't bother me!
Wednesday, July 13, 2011
A Visit to Texas


We are usually terrible about taking photos with friends that we see during our visits back to Texas, so I made a goal to be more intentional about getting pictures with everyone this trip. We weren't 100% successful, and we forgot to take a picture with several fun friends that we got to spend time with, but we did better than in the past!
The children of our friends are the biggest reminder of how long it's been since our last visit....they grow and change so quickly and several of our friends have kids that are now at least a year old who we hadn't yet gotten to meet! It's fun to think that on our next trip back to Truman's home state, we'll be introducing everyone to our son!

Sunday, July 10, 2011
We're an Aunt & Uncle!
In March, Truman's sister & brother-in-law, Carita & Dennis, adopted a precious baby boy. We finally had the chance to meet sweet Jacob during our visit to Texas last month, when he was about 2.5 months old! We are absolutely in love with him.
 Jacob becoming a part of our family was a joyous miracle, and a huge answer to many, many prayers after a nearly decade long struggle with infertility for Dennis & Carita. I am not even going to attempt to share their journey or the story of Jacob's adoption, but Dennis shares it beautifully in a series of a blog posts that he wrote shortly after they brought Jacob home. You can read their story here:
Part 1
Part 2
Part 3
Part 4
You might want to have some tissues handy!
 Jacob seriously couldn't be any more adorable! Even his fabulous extra chubby, squeezable thighs are perfect. And they have seriously gotten even chubbier since we took these pictures last month.

 When we found out that we were having a son, shortly after Dennis & Carita adopted Jacob, Truman was extra excited because the cousins will only be 6 months apart in age. We hope they'll have lots of fun memories together, especially with both of them being boys and being so close in age!

 Jacob is already so loved! And his Uncle Truman and Aunt Amber are big fans!

Part 1
Part 2
Part 3
Part 4
You might want to have some tissues handy!


Thursday, July 7, 2011
Nursery Progress: Board & Batten
With just 10 weeks to go until my due date, we are in full preparation mode for Little Lo. We are making progress in decorating the nursery! We picked up our crib tonight, the bedding arrived earlier this week, I ordered extra fabric with the bedding to sew curtains this weekend, I bought a mobile off of Craigslist yesterday, and I have collected a pile of supplies to create some art for the room. I am so excited to see it all come together!
After moving my craft room to the basement & emptying out the future nursery, our first step was to install board and batten. Here are a few before photos of the room:

 And after with the board & batten all finished!


 You will notice that I am absent from all of the "action" photos of the board & batten progress. That is because I didn't do any of the work! I helped to decide on the logistics of the project and brainstorm some ideas and "assisted" briefly a couple of times when Tru needed an extra set of hands to hold the longer horizontal pieces while he nailed them in, but otherwise, he completed this project entirely on his own over a couple of weekends and several evenings. He did an awesome job! He got a new tool (a nail gun) as a part of the job.

 We used 1/2 inch MDF, which we purchased in sheets from Home Depot. We had them cut the sheets into strips for us. We lucked out because we were there on Father's Day evening and it wasn't busy so they were willing to take the time to make the cuts for us....all 30ish of them. If they are busy, they will be hesitant to make that many cuts and tie up the saw, so if you are hoping they will cut the strips for you, I would recommend going at an "off time" when they won't be as busy to increase your chances!
There are several different ways that I've seen people deal with their existing woodwork at the bottom, from leaving the overhang of the wider MDF where it meets their baseboards to cutting the bottom of each vertical strip up at an angle to make it thinner where it meets the baseboard, to ripping out the baseboard and replacing it with MDF strips to match. As we looked at our situation and our particular baseboard, we opted to do something I haven't seen done on any other tutorials. Our baseboards are significantly narrowed at the top, so we opted to cut the bottom of each board at a 45 degree angle, with the point facing down, so that the point of each strip would overlap the top of our baseboard just a little bit. (I forgot to take a close up photo of this, but will try to add one soon.)
We made our thicker horizontal strip around the top 3.5 inches wide and the vertical strips 2 inches wide. We spaced 12-13 inches between each strip. Unless you have long one really long wall, you will visually not be able to tell if they aren't all exactly the same width apart. Deviating a little bit will help you to avoid obstacles in the room like light switches, outlets, and vents so you don't have start and stop your trip pieces above and below them. We started with a tricky spot, under the window where the vent was, and then worked out from there (as recommended by the tutorial on It's The Little Things.) We then measured out from those first 2 vertical strips, and used painters tape to hold the tops of the strips in place while we moved around the room and adjusted the spacing until we had all of the strips where we wanted them.
 We would highly recommend installing in this order:
1. Mark off your walls with a pencil all the way around the room where you want the board and batten to stop, and then paint your walls white up to that mark. (We marked approximately the middle of where the horizontal strips would hang so we could be sure that those boards would cover our paint line.)
2. Prime the top and sides of each strip of plain MDF with Kilz, then paint each one with two coats of white paint. We used Behr Plus Primer from Home Depot and had them custom color match the paint to the color that was on our woodwork when we moved in. It will be SO much easier to paint the strips with their initial coats of paint before they are on the wall, then you can apply just one coat after they are hung and you have filled your nail holes!
3. Hang the horizontal strips first, being sure to use a level to make sure they are straight.
4. Plan the spacing & placement of each vertical strip, and use a pencil to mark both sides of the strip onto the wall in the spot where you are going to hang each. You won't see your pencil marks after you caulk and paint the final coat.
5. Hang the vertical strips. You will want to use a level to make sure these are also straight.
6. Use paintable caulk to caulk along both sides of each vertical strip, which will fill in the seams and give it a much more finished look! Make sure to use paintable caulk! Thrifty Decor Chick gives a helpful tutorial on caulking & spackling if it is new to you.
7. Fill the nail holes with spackle and sand down when dry.
8. Apply 1 additional coat of paint to all the strips to cover the caulk & nail holes. Truman rolled the flat tops of the strips, then used a brush to paint the sides of the strips as he went along. After you've given one additional coat to all of the strips, you can touch up as needed if spackle is still showing through in some spots.
 Those are our hints & tips after installing board & batten and doing lots of research to decide how we were going to go about it. It isn't necessarily a difficult project, but it is tedious. But, it was definitely worth the effort (and Tru agrees too!)
I am excited to share the other projects & details of the nursery as it comes together over the next month or so! I am even more excited to have a finished room all ready for our little guy's arrival!
After moving my craft room to the basement & emptying out the future nursery, our first step was to install board and batten. Here are a few before photos of the room:


We are so happy with how it turned out! Adding the board & batten gave the room a lot more character, makes it feel lighter & brighter, and the finished trim work turned out exactly as I had envisioned it in my head. (Don't you love it when that happens?!)


For those of you who might be interested in installing board & batten as well, I am not going to write a complete step-by-step tutorial because there are already some detailed & very helpful ones out there. So, I will share the tutorials with you that we found the most helpful, and then just share some of the specific details of how we decided to execute the project in our space. We found this tutorial from It's The Little Things incredibly helpful. Kimba also shares some valuable hints in her tutorial on A Soft Place To Land.

There are several different ways that I've seen people deal with their existing woodwork at the bottom, from leaving the overhang of the wider MDF where it meets their baseboards to cutting the bottom of each vertical strip up at an angle to make it thinner where it meets the baseboard, to ripping out the baseboard and replacing it with MDF strips to match. As we looked at our situation and our particular baseboard, we opted to do something I haven't seen done on any other tutorials. Our baseboards are significantly narrowed at the top, so we opted to cut the bottom of each board at a 45 degree angle, with the point facing down, so that the point of each strip would overlap the top of our baseboard just a little bit. (I forgot to take a close up photo of this, but will try to add one soon.)
We made our thicker horizontal strip around the top 3.5 inches wide and the vertical strips 2 inches wide. We spaced 12-13 inches between each strip. Unless you have long one really long wall, you will visually not be able to tell if they aren't all exactly the same width apart. Deviating a little bit will help you to avoid obstacles in the room like light switches, outlets, and vents so you don't have start and stop your trip pieces above and below them. We started with a tricky spot, under the window where the vent was, and then worked out from there (as recommended by the tutorial on It's The Little Things.) We then measured out from those first 2 vertical strips, and used painters tape to hold the tops of the strips in place while we moved around the room and adjusted the spacing until we had all of the strips where we wanted them.

1. Mark off your walls with a pencil all the way around the room where you want the board and batten to stop, and then paint your walls white up to that mark. (We marked approximately the middle of where the horizontal strips would hang so we could be sure that those boards would cover our paint line.)
2. Prime the top and sides of each strip of plain MDF with Kilz, then paint each one with two coats of white paint. We used Behr Plus Primer from Home Depot and had them custom color match the paint to the color that was on our woodwork when we moved in. It will be SO much easier to paint the strips with their initial coats of paint before they are on the wall, then you can apply just one coat after they are hung and you have filled your nail holes!
3. Hang the horizontal strips first, being sure to use a level to make sure they are straight.
4. Plan the spacing & placement of each vertical strip, and use a pencil to mark both sides of the strip onto the wall in the spot where you are going to hang each. You won't see your pencil marks after you caulk and paint the final coat.
5. Hang the vertical strips. You will want to use a level to make sure these are also straight.
6. Use paintable caulk to caulk along both sides of each vertical strip, which will fill in the seams and give it a much more finished look! Make sure to use paintable caulk! Thrifty Decor Chick gives a helpful tutorial on caulking & spackling if it is new to you.
7. Fill the nail holes with spackle and sand down when dry.
8. Apply 1 additional coat of paint to all the strips to cover the caulk & nail holes. Truman rolled the flat tops of the strips, then used a brush to paint the sides of the strips as he went along. After you've given one additional coat to all of the strips, you can touch up as needed if spackle is still showing through in some spots.

I am excited to share the other projects & details of the nursery as it comes together over the next month or so! I am even more excited to have a finished room all ready for our little guy's arrival!
Monday, July 4, 2011
Happy 4th of July!


Friday, July 1, 2011
Food For Friday: Cheesy Baked Ziti
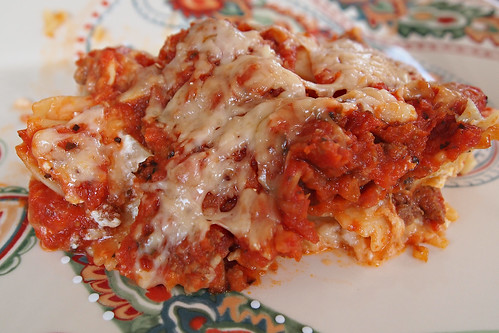
A few months ago, a friend from our church small group brought us dinner and she brought by this delicious baked ziti. We liked it so much we got the recipe from her and have made it several times since. It makes a huge batch of pasta, so unless you are feeding a large family, it's another great recipe to either freeze half of or make a double batch to freeze one for later (freeze after you assemble it and before you bake it.) When he has a choice, ziti is not my husband's favorite pasta shape, so I usually use farfalle (bowtie) pasta instead. It's quick and easy to assemble, faster than a lasagna, but with a very similar flavor to lasagna. Great, in my opinion, for a quick and easy dinner at home! Serve with salad and garlic bread for a complete meal.
Ingredients:
1 box (approx. 1 lb) of pasta (I usually use Barilla Plus Farfalle)
1 yellow onion, diced fine
1 lb of ground beef (or a combination of ground beef & Italian sausage)
Grated fresh Parmesan cheese
2 jars of spaghetti sauce (I like to use Classico Roasted Garlic)
1 package (6-8 oz.) of sliced Provolone cheese
1 1/2 cups sour cream
6 oz. shredded Mozzarella cheese
Directions:
Boil pasta noodles according to directions on package, until tender. Over medium heat, spray a large sautee pan with olive oil and sautee onion for a few minutes. Add the ground beef (and Italian sausage if using a combination) and brown the meat with the onion until it is cooked through. Pour in the 2 jars of sauce and mix together.
Spray a large casserole dish with cooking spray or olive oil. Place half of the cooked pasta in the bottom of the dish. Layer 1/2 of the meat sauce, all of the sour cream, and all of the provolone slices on top of the pasta. Put the other 1/2 of the pasta on top of the provolone, then top with the rest of the meat sauce, the shredded mozzarella, and a sprinkling of grated parmesan cheese on top.
Cover and bake at 350 degrees for 30 minutes or until heated through and the cheese is bubbling. (If you assemble and refrigerate before baking, bake for 1 hour at 350 degrees. Allow extra time if baking from frozen.)
After removing it from the oven, allow it to set for 5 minutes before serving.
Subscribe to:
Posts (Atom)


